Cart66 Cloud brings a suite of secure, connected services to WordPress that takes ecommerce to a level that cannot be achieved through plugins alone. For example, all credit card payments are PCI compliant thanks to the secure hosted payment page that comes with your Cart66 Cloud account. You also get a business class email service, secure file storage (if you want to sell digital files), a built-in recurring billing engine, and everything works with over 100 built-in payment gateway integrations. Let’s take a look at the five steps to Cart66 Cloud.
Why Can’t I Just Auto-Upgrade?
Ok, so the first question you might be asking is, “Why is this not an automated process?” There are several parts to this answer.
Product Format Enhancements
Cart66 Pro includes a variety of ways to define products. Products can be defined as basic / native Cart66 Pro products. Or, if you wanted to have more than two options for your product, you could use Gravity Forms to build your product order forms.
Cart66 Cloud simplifies the entire process. Now, you can build products, directly in Cart66 Cloud, with as many product options as you want. You can also track inventory on the individual product options. For example, if you want to sell event tickets to your conference, you can collect all the information in the product order form like meal preference, t-shirt size, and preferred tracks at the conference.
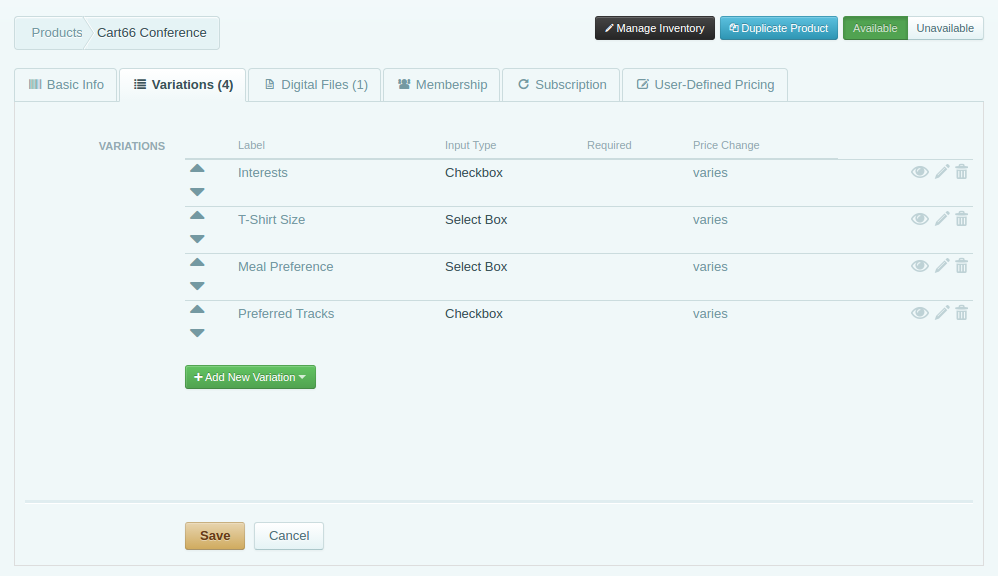
With these enhancements, it was not possible to migrate Cart66 Pro product definitions into Cart66 Cloud. The underlying structure of the products is dramatically different.
Shipping Enhancements
Cart66 Cloud offers enhanced shipping features with the introduction of shipping modes.

Cart66 Cloud utilizes the same workflow as Cart66 Pro with shortcodes, but adds a bunch of new features for creating order forms with unlimited product options. The options can dynamically change the price of the product. You can track inventory on the product options too.
Tax Enhancements
Collecting tax can be a really tricky thing. Depending on where you need to collect tax, there may be multiple tax rates and those tax rates may even interact with each other. For example, if more than one tax rate applies, then the second tax may replace the first tax, add to the first tax, or even be a compounded tax where you actually charge tax on the tax! Crazy, right?
We got so many different requests for ways to collect tax so we dramatically enhanced the tax system in Cart66 Cloud. We also include Taxamo integration to collect VAT tax on digital products.
Bottom Line
Cart66 Cloud includes so many new features and enhancements that if we simply ported over the data from Cart66 Pro, additional data would still be needed to make sure everything was set up properly.
Getting Things Set Up
There are five steps in getting your Cart66 Cloud account setup.
- Define you products
- Configure shipping
- Configure taxes
- Update your shortcodes
- Connect your secure payment page
Cart66 Cloud Products
Cart66 Cloud secures the names, prices, and variations for your products as well as the shopping cart itself. This prevents hackers from being able to hijack your shopping cart or change the price of your products. Note, however, that all the product descriptions and images are in WordPress. So, you do not have to re-create your product pages in WordPress.
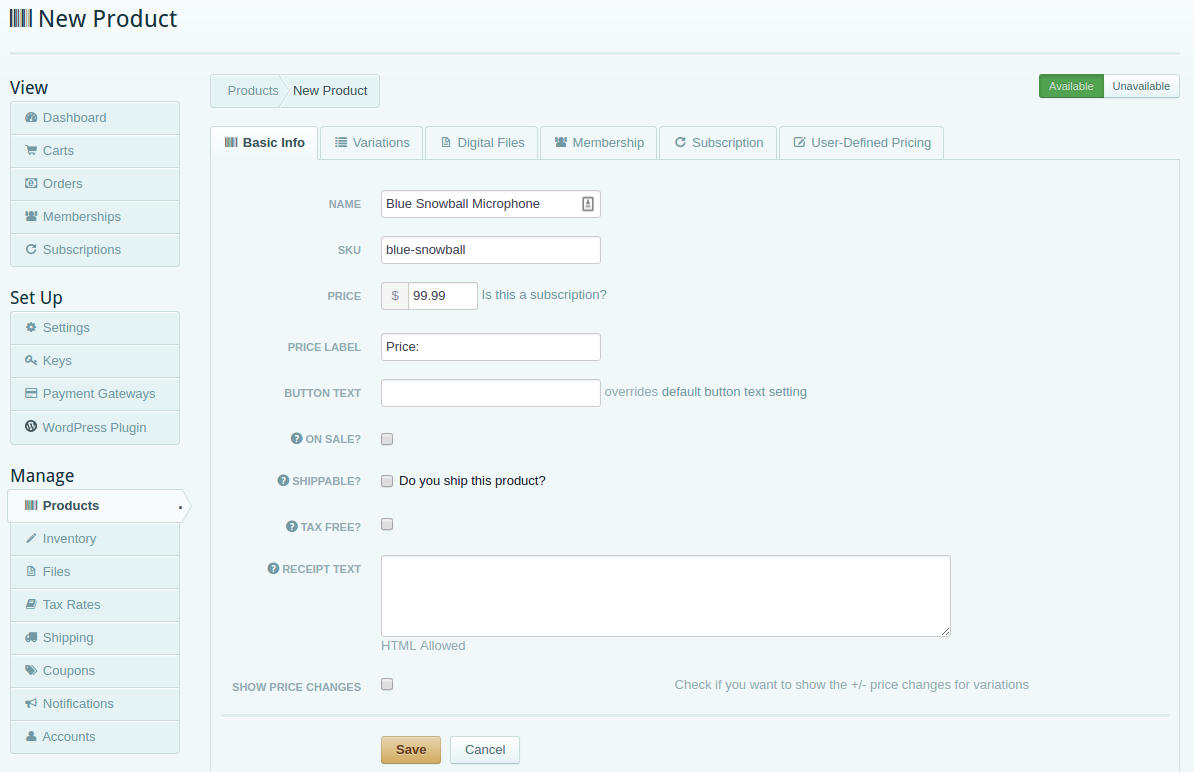
Creating your products in Cart66 Cloud is really quick and easy. You just enter the names and prices of the products. If your products have complex options, you don’t need Gravity Forms anymore, you can define all the variations directly in Cart66. You can create a product in Cart66 Cloud in less than 5 seconds.
Here is the Cart66 Cloud product form for creating and editing products. Basically, you just type in the name and price and click save. Of course, you can attach files, and define variations for your products too. But you don’t have to enter in product descriptions or upload images or anything like that. You will just update the shortcode on your WordPress site and WordPress will pull in your new Cart66 Cloud “Add to Cart” button (or product order form if your product has options.)
Duplicating Products
As you are setting up products, if you have several similar products, you can duplicate a product to save time. Just click the Goodies button and Duplicate Product.

Shipping
Cart66 Cloud provides a bunch of shipping enhancements by offering the following shipping modes:
- Free Shipping
- Weight Based Shipping
- Price Based Shipping
- Real-Time Shipping Quotes
Regions are the underlying idea behind both shipping and taxes in Cart66 Cloud. A region can be any geographic area you’d like. It can be as broad as an entire country or as narrow as single postal code. For example, if you are in the United States, you could set up “South East” region that includes the states Virginia, North Carolina, South Carolina, Georgia, and Florida. You could then set up a region for the North East, West Coast, South Central, etc.
The regions can be as broad or as narrow as you’d like. This gives you great flexibility for defining your shipping rates.
Once you have set up your regions you can then establish the methods (like Ground, 2 Day, etc) and the rates. The rates represent a combination of the methods and the regions. For example, you might charge $10 for Ground shipping to the South East region. Also, if you don’t ship to a particular region, you can exclude them.
Both weight-based and price-based shipping modes are based on regions.
If, despite a warning on losing sales with real-time shipping quotes, you would like to have shipping costs calculated at checkout, you can enable Real-Time Shipping mode.
Configuring Shipping Methods and Rates
By default, you will see a couple regions, and methods set up. For example, you start off with Continental United States and a region and Ground as a method. Then, you just set up the rates you’d like to charge.
In this example, we have Price Based shipping enabled, but both price based and weight based work off the step ladder principle. Starting at the bottom (from $0.00) you introduce pricing steps. The last step includes the price you set and all orders with a price higher than the last step. In other words, there’s an open ceiling.
As you set up the rates for the methods, it will look something like this.

Note: Since you are defining your own rates and regions, it is not tied to any specific shipping carrier. So, you could use FedEx, USPS, UPS, or any other carrier to send your Ground packages.
Configuring Taxe Rates
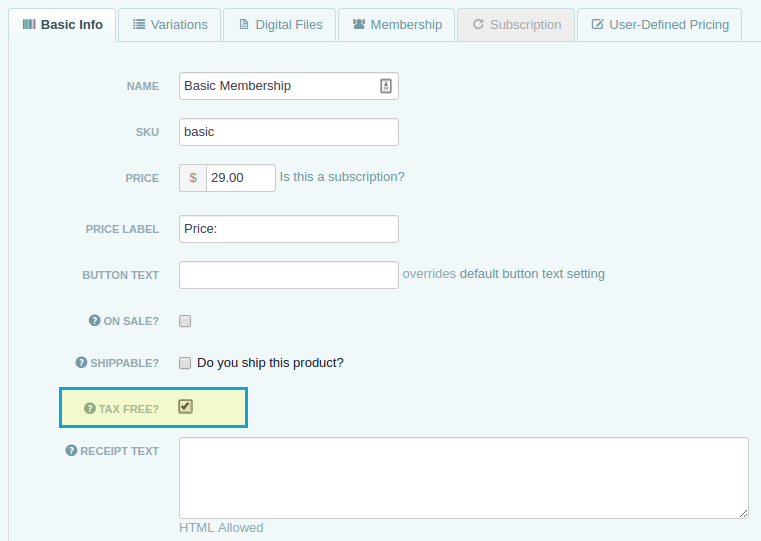
Tax Free Products: You do not have to collect tax on every product. As you are setting up your products, if you don’t want to collect tax for that product you can exclude it from taxes like this:
To collect tax on a sale, you set up the region where you want to collect tax. Then you set up the tax rates for that region. You can set up multiple different tax rates for the same region. For regions with multiple rates, you specify how the rates interact with each other.
Sales Tax Example
Here is an example of setting up a 5% sales tax for Virginia.
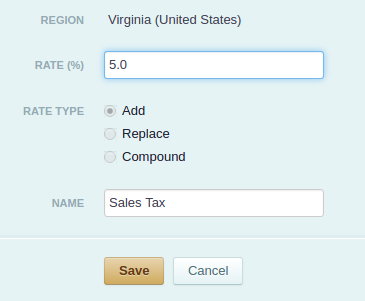
This tax is added to the order. In some places, there are taxes where one tax rate replaces another tax rate. Other times tax rates are compounded. Cart66 provides settings so you can control how multiple tax rates interact with each other. When an order is processed all the applicable tax rates are calculated from the top down.
Updating Product Shortcodes
Cart66 Cloud works almost exactly like Cart66 Pro / Lite in the sense that you can place Add to Cart buttons (and product forms) anywhere on your site with a shortcode. Cart66 Cloud introduces additional features to control the display and layout of the product forms, but the general idea is exactly the same.
Cart66 Pro uses shortcodes that look like this
Cart66 Cloud uses shortcodes that look like this
[cc_product sku="<product-sku>"]
Cart66 Cloud offers a few other options for choosing the layout of the product form and whether or not you want to show the quantity field, but the format is very similar. To make things even easier, you can use the same product-sku in Cart66 Cloud as you had in Cart66 Pro.
To change a Cart66 Pro shortcode into a Cart66 Cloud short code, all you have to do is:
- Change the name of the shortcode from
add_to_carttocc_product - Change the
itemattribute tosku
Secure Hosted Payments
The last step in the process is connecting your WordPress site to your secure hosted payment page. Cart66 Cloud is the only WordPress ecommerce solution that brings security and PCI compliance to you right out of the box. You don’t even need your own SSL certificate because Cart66 Cloud’s hosted payment page provides all the security for the credit card transactions. Here’s how it works.
Cart66 Cloud has built-in support for over 100 different payment gateways as well. So there is no need for you to buy any add-ons to connect with your payment gateway. Learn more about your Secure Hosted Payment Page.
More Information
We have a bunch of great resources to help you get started and your support team is there to help you also. Here are a few links to help you find the information you need.
Video Tutorials: Complete tutorials including video along with written instructions to get the most out of Cart66 Cloud.
Here are a few links to the most popular tutorials:
- Getting Started With Cart66 Cloud
- Earn Trust With The Cart66 Secure Site Seal
- Sell Tickets and Event Registrations
- Inventory Management
- Sell Music
- Accept Donations (one-time and recurring)
- Sell Access To Premium Content on Your WordPress site (like a digital magazine)
Cart66 YouTube Channel
You’ll find even more videos about WordPress, ecommerce, and growing your online business in the Cart66 YouTube Chanel.
